
I’ve been meaning to give a try to the PowerShell Core 6.0 builds on Linux recently. The PowerShell team offers some nice pre-built Docker images you can use to test it, so that’s great.
I thought that would be a simple, but cool scenario to try out the new Azure Container Instances service! Of course, you cannot use the pre-built image directly for this, as you wouldn’t have a direct way to connect to the hosted container, so I decided to create a new image that not only had PowerShell Core 6.0 in it, but also have SSH built-in. This would be useful to quickly spin up a PowerShell-on-Linux environment for demos and simple tests.
So the first thing to do is to create a new empty directory for our new container files:
mkdir powershell
cd powershell
Then, using a text editor (Vim, is my poison of choice) I created a new dockerfile in this directory,
with the following contents:
FROM microsoft/powershell

RUN apt-get update && apt-get install -y openssh-server
RUN mkdir /var/run/sshd

ENV newuser tomasr

# add new user
RUN useradd -m ${newuser}
RUN usermod -aG sudo ${newuser}
# copy SSH keys
RUN mkdir -p /home/${newuser}/.ssh
ADD authorized_keys /home/${newuser}/.ssh/authorized_keys
# set right permissions
RUN chown ${newuser}:${newuser} /home/${newuser}/.ssh
RUN chown ${newuser}:${newuser} /home/${newuser}/.ssh/authorized_keys
RUN chmod 700 /home/${newuser}/.ssh/authorized_keys

EXPOSE 22
CMD ["/usr/sbin/sshd", "-D"]
This dockerfile does a few simple things:
- Inherits from the official PowerShell docker image
- Installs SSHD
- Creates a new user called
tomasr - Copies my
authorized_keysfile to the new user dir and sets the right permissions - Starts SSHD
Now, let’s build ourselves a new docker image:
docker build -t powershell .
If everything works, you should see a message similar to Successfully built 34f996c46a23.
Now, before I can use this image with Azure Container Instances, I need to push this to
some image repository. I’ll use Azure Container Registry,
which I have already provisioned on my Azure account by this point.
So let’s provide docker with the credentials to my registry, tag the image, and then push it to the registry:
sudo docker login blogtests.azurecr.io -u <user> -p <password>

sudo docker tag powershell blogtests.azurecr.io/tomasr/powershell

sudo docker push blogtests.azurecr.io/tomasr/powershell
Once this is complete, we can use the Azure CLI
to create a new container instance called p4 using our new image. We’ll give it a public IP address listening
on port 22:
az container create --name p4 --image blogtests.azurecr.io/tomasr/powershell --resource-group blogtopics --ip-address public --port 22 --registry-username <username> --registry-password <password>
After a few minutes, we can check if our deployment is complete and our container is running, using the following command:
az container show --name p4 --resource-group blogtopics
If the container is ready, we should see something like:
  "ipAddress": {
    "ip": "52.168.164.152",
    "ports": [
      {
        "port": 22,
        "protocol": "TCP"
      }
    ]
  },
  "location": "eastus",
  "name": "p4",
  "osType": "Linux",
  "provisioningState": "Succeeded",
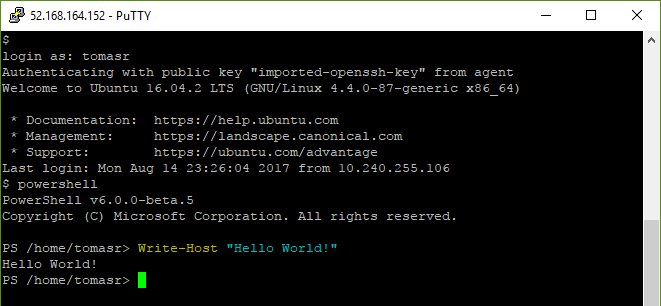
When the container is fully deployed, we just need to use an SSH agent with the right private key to connect and run powershell on it:
Once we’re done playing with our environment, we can just delete the container instance:
az container delete --name p4 --resource-group blogtopics
Conclusion
Using containers, we’ve built a simple way to quickly provision a new machine to do simple PowerShell demonstrations. It’s not terribly useful, but still a fun use of technology!
