
I’ve been playing a lot lately with Azure API Management. Recently, a customer asked me about the following scenario:
- They wanted to expose a Web API through API Management
- API Management should enforce and validate that an OAuth2 token was provided by the caller
- The underlying API did not know (or care) about the OAuth2 token.
There is an article on the API Management documentation about this very topic, but that one assumes that the Web API itself is setup to accept OAuth2 tokens, which is a bit of a more complex scenario. While good, I found the article a bit confusing to follow, so I thought I’d document here the steps I followed to test the customer scenario.
I’ll assume we already have an API implemented and published in API Management and that we want to use Azure Active Directory as the OAuth2 provider. For this article, I’ll use an API I called PQR in API Management.
Step 1: Register the Azure AD applications
The first step would be to register a new Azure AD application to represent our API. I’ll create a new application like this:

Next create a second application, which we’ll call apim-portal. This one will be used to
represent the API Management Developer Portal, so that we can test our APIs from it.
Once the application is created, we need to generate a new key for it:

Make a note of both the application Id and the new key, as we’ll need this in a moment.
Also, grant permissions to apim-portal to call the apim-pqr application.
You could also create the application easily using the
az ad sp createcommand in the Azure CLI.
Step 2: Adding the OAuth2 authorization server
Now we can configure a new OAuth2 authorization server in our API Management instance. We’ll do this on the
new experience in the Azure Portal. First, go into the OAuth 2.0 section in the portal, and click
the + Add button.
I will call this instance aad-oauth2-pqr:
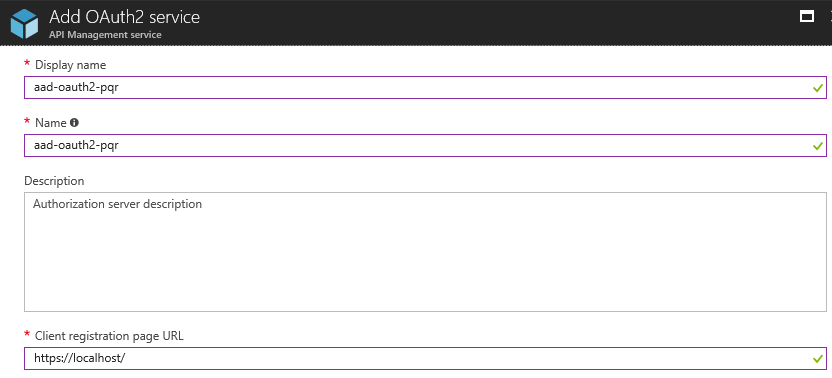
We don’t need the client registration URL for now, and besides, there doesn’t seem to be a pretty way to configure it for AAD.
I’ll leave only the Authorization code grant type enabled for now, and I’ll configure
the authorization endpoint URL for my AAD Tenant:
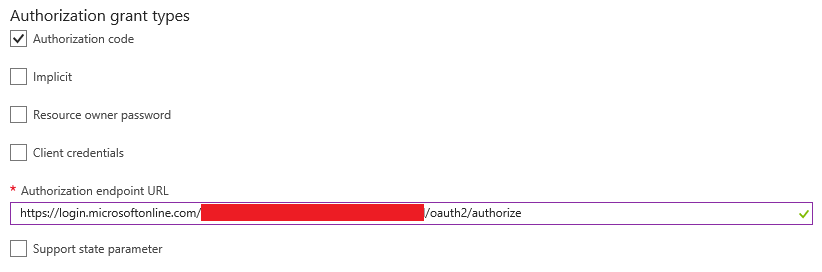
The authorization URL will be in the form
https://login.microsoftonline.com/{tenantid}/oauth2/authorize.
Then we can configure the Token endpoint URL, as well as adding the value of the resource parameter.
The latter should be configured with the value of the App ID URI field of the apim-pqr application
we created in the first step:
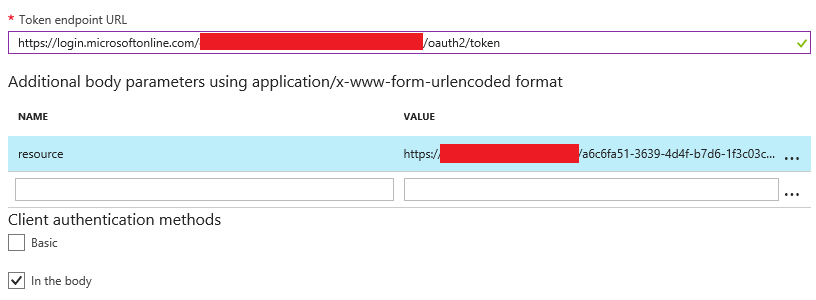
The token URL will be in the form
https://login.microsoftonline.com/{tenantid}/oauth2/token.
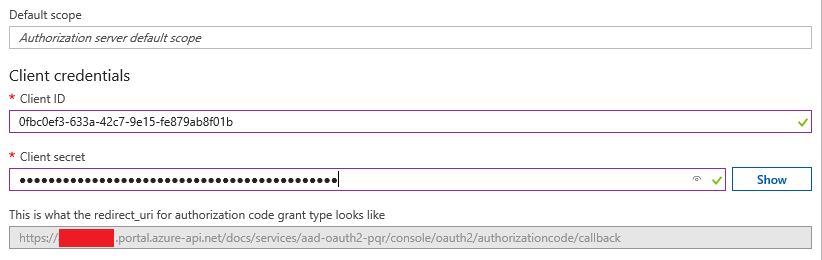
We’ll leave the default scope empty for now, and configure the Client ID/Secret that we copied
after creating the apim-portal application in step 1:
After this, just click the Create button to save the changes. Note that you can also do this
using the Publisher Portal, with almost the exact same user experience.
Before moving on to the next step, there is something missing. In the screenshot above, notice there’s
a field with the redirect_uri to be used with API Management. We need to copy this URL, and
add it to the Reply URLs of our apim-portal application in Azure Active Directory. Otherwise, authentication
with fail later on.
Step 3: Configure the API to use OAuth2 authorization
The next step is to configure our PQR API so that API Management knows that invoking the API requires an OAuth2 token. On the Publisher Portal, we can modify this from the Security tab of the API properties. On the Azure Portal, we’d configure this from the API settings under the Security headline:

Notice that doing this doesn’t actually cause API Management to enforce that an OAuth2 token is provided at all. Instead, it adjusts the Developer Portal experience so that you can acquire the OAuth2 token from the authorization server when trying out one of the API’s operations.
Step 4: Validating the OAuth2 token
At this point, you can still invoke the API through API Management just using the subscription key, without having to provide an OAuth2 token. This is because our API implementation doesn’t require one, and API Management is not configured to require one.
What we need now is to add a policy at the API scope that uses the validate-jwt policy statement
to check that a token is provided in the Authorization header, and that it was issued by our
Azure AD tenant.
The policy would look something like this:
<policies>
  <inbound>
    <validate-jwt
        failed-validation-error-message="Unauthorized. Access token is missing or invalid."
        failed-validation-httpcode="401"
        header-name="Authorization">
      <openid-config url="https://login.microsoftonline.com/{tenantId}/.well-known/openid-configuration" />
      <required-claims>
        <claim name="aud">
          <value>https://{tenant}.onmicrosoft.com/a6c6fa51-3639-4d4f-b7d6-1f3c03c78227</value>
        </claim>
      </required-claims>
    </validate-jwt>
    <base />
  </inbound>
  <backend>
    <base />
  </backend>
  <outbound>
    <base />
  </outbound>
  <on-error>
    <base />
  </on-error>
</policies>
Here we’re using the OpenId Connect metadata published by our Azure AD tenant so that API Management
can get details such as the signature keys to validate the token. Then we’re also checking that the
token was generated for the right API, by comparing the Audience claim against the App ID URI
of the apim-pqr application.
Step 5: Testing the API
At this point, we should be able to test the API with OAuth2 authorization from the API Management Developer Portal, but I also wanted to test it using a simple console Application.
You would need to register a Native Client application in Azure AD and grant it permissions to invoke our
apim-pqrapplication to do this.
var authority = "https://login.windows.net/{myTenant}.onmicrosoft.com";
var resource = "https://{myTenant}.onmicrosoft.com/a6c6fa51-3639-4d4f-b7d6-1f3c03c78227";
var clientId = "79be95ca-xxxx-xxxx-xxxx-1a0a1e1b54ce";
var clientUri = new Uri("https://afs-apim1-client");
var subscriptionKey = "xxxxxxxxxxxxxxxxxxxxxxxxxxxxxxxx";

var context = new AuthenticationContext(authority);
var platformParams = new PlatformParameters(PromptBehavior.Always);
var token = await context.AcquireTokenAsync(resource, clientId, clientUri, platformParams);

var credentials = new TokenCredentials(token.AccessToken);
var pqr = new PQR(credentials);
pqr.HttpClient.DefaultRequestHeaders.Add("Ocp-Apim-Subscription-Key", subscriptionKey);
If the client is configured successfully, it should work just fine! We can also change the parameters to cause the request to fail. For example, if we obtained the token asking for the wrong resource, we’d get an error such as:
HTTP/1.1 401 Unauthorized
Content-Length: 85
Content-Type: application/json
Date: Thu, 09 Nov 2017 21:32:53 GMT

{ "statusCode": 401, "message": "Unauthorized. Access token is missing or invalid." }
What’s next
I would like to try to get this scenario working using OpenID Connect (supported now by API Management), rather than OAuth2, as it really is simpler to configure. Unfortunately, I was unable to get it working the first time around, so need to spend more time with the feature to completely grok how it is meant to work.
