
I've been building a small application the last few days using Castle, including both Monorail and ActiveRecord, which I had not used before. It's been a very pleasant experience overall, as I dig a bit deeper into some of the features in Castle I had not used before. At the same time, it's been a bit frustrating as some of the documentation isn't quite up to date, or, more commonly, doesn't quite list all the necessary steps.
One of the aspects that gave me a bit of trouble getting to run was using Castle.Components.Validator to add validation to the application. Hammett has a nice introduction to the validation framework on this screencast, but even following this and the documentation I couldn't quite get it to work (I think part of the issue was that I use brail, while he uses nvelocity).
In this example, I'm using ActiveRecord for persistence so that will affect some of the code, so be aware of that. Here's exactly what worked for me.
Step 1: Reference Castle.Components.Validator.dll on your project where your model classes are defined. Where necessary, reference the Castle.Components.Validator namespace. Make sure you pick a recent copy of the Castle libraries from the build server :-).
Step 2: Add validation attributes to the properties of your model classes. Make sure you explicitly specify a proper error message on your attributes, because the default messages might not be as informative. Here's an example:
[Property(Length = 100, NotNull = true)]


[ValidateNonEmpty("Name cannot be empty")]


[ValidateIsUnique("Name must be unique")]


public string Name {


   get { return _name; }


   set { _name = value; }


}
Step 3: Inherit your monorail controller from SmartDispatcherController so that the validation facilities are available. In my case, I'll use the ARSmartDispatcherController class so that I can use the nice ActiveRecord integration facilities as well:
public class ClientController : ARSmartDispatcherController {


   // ...


}
Step 4: Use the [DataBiind] or [ARDataBind] attributes on your handler methods, and make sure you enable the Validate property:
public void Create(


   [ARDataBind("client", Validate=true)] Client client


) {


   //...


}
Step 5: Inside your handler code, check if the bound object contains error before persisting and if so redirect as appropriate if not. You can use the HasValidationError() method to check if the object triggered validation errors, and then call GetValidationSummary() to get the list of error messages.
if ( HasValidationError(client) ) {


   Flash["client"] = client;


   Flash["summary"] = GetErrorSummary(client);


   RedirectToReferrer();


} else {


   client.Create();


   RedirectToAction("list");


}
I'm currently wrapping GetErrorSummary() in my base controller class so that I can return a single string with all validation errors to avoid having to loop around in the view (I'm lazy):
protected string GetErrorSummaryMsg(object obj) {
StringBuilder text = new StringBuilder();
bool isFirst = true;
foreach ( string str in GetErrorSummary(obj).ErrorMessages ) {
if ( !isFirst )
text.Append("" );
text.Append(str);
isFirst = false;
}
return text.ToString();
}
So far you should already have server-side validation working. Now let's add client side validation:
Step 6: Include the necessary for client side validation to work; you'll want to do this in your layout view:
${AjaxHelper.InstallScripts()}


${Scriptaculous.InstallScripts()}


${FormHelper.InstallScripts()}
The last one, in particular, is pretty important; without it you'll later get bizarre JS errors like "Validation is not defined". This actually took me a while to get because it's the only one that Hammett doesn't explicitly include in his demo.
Step 7: Enable client-side validation in your form. For this, you need to add a couple of custom attributes to your form tag: immediate and useLabels and set them to true. Using FormHelper, here's what it would look like:
${FormHelper.FormTag("create.rails", {"immediate":'true', "useLabels":'true'})}


...

${FormHelper.EndFormTag()}
For the curious, this actually generates the following
<form action='create.rails' method='post' id='form1' useLabels="true" >
The closing tag will also contain the validation script using whatever validation provider your selected (prototypes, by default), unless you disable validation using FormHelper.DisableValidation().
Step 8: Declare your field labels and input controls. Using FormHelper, again, this is easy:
<tr>


   <td>${FormHelper.LabelFor("client.Name", "Name:")}td>


   <td>${FormHelper.TextField("client.Name")}td>


tr>
Step 9: Put the error messages from the server-side validation somewhere on your form:
"summary"): ?>


<tr>


   <td colspan='2' class='validator'>${summary}td>


tr>
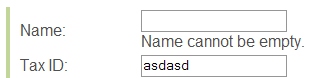
And now, client side validation should be working :-) Notice that the client-side validation messages seem to be tagged with the "validation-advice" CSS class, so that makes them easy to style.
